How does a sanding-screw saw work? Here are some tips for using a scroll saw properly. Position your hands in the proper positions, keep the wood firmly on the table, plan your cuts, and sit at the correct height. Use the correct tool for the job. To help you get started, we have included a video. Then follow our easy steps to get started. This video should help make you a scrollsaw master.
Set the speed to sand a scroll saw
Set up the blade and blower of your scroll saw. Depending upon the type of cut that you are making, the blower should point at the blade. Make sure your scroll saw is ready to go by tightening the belt and applying lubrication. This is vital for sanding. However you can also adjust blade settings to achieve desired results.
Start by inspecting your blade to determine the right speed for sanding. A well-balanced blade won't vibrate as much. It should be a sharp, narrow, black line. If the blade appears blurred or sloppy, it is probably out of tune. If the blade isn’t cutting through the material properly, adjust the speed of your scroll saw.
A scroll saw makes it easy to make on-the-spot turn
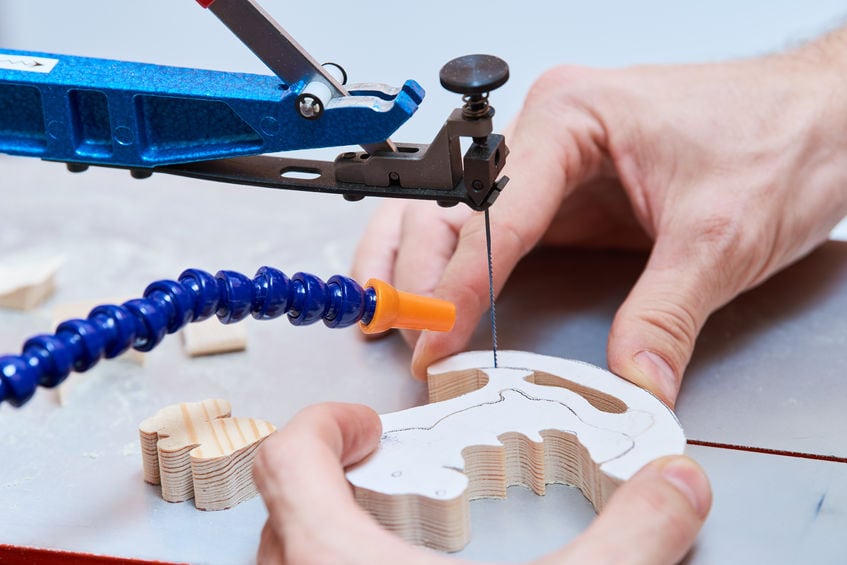
The scroll saw offers unparalleled control when cutting but you need to be careful. Before you use the scroll saw, ensure that it is completely dry. Next, analyze the grain patterns for your project. You can also use tape to keep the blade straight and check the cut square while cutting. When you're done with cutting, remove the tape. Then sand all edges. After you are done, spray some lacquer. This safety precaution is important because scroll saws can be dangerous.
Once you've decided which cuts you want to make with a scrollsaw, you will need a template. To stop the blade veering off-line, you'll need to leave some positive space. Begin by marking the pattern with a pencil. Once you have your template, get the right gear. Then, guide your project through the scroll saw. Use the smallest available blade size but be careful not to veer off.
Using a pinless sander to sand a scroll saw
A scroll saw can be used with a pinless sander. Scroll saws come with a belt you can adjust to smoothen the edges. It is compatible with most scroll saws of five inches. The belt can be used as a guide to help correct wandering lines and burns. There are many options for belts that can be customized to meet the specific needs of your scrollsaw.
Pinless sanders will work with most scrollsaws and conversion adapters. They fit on the blade like a Plain End, Pinned or Pinched blade. To use one, just cut the pivot head. Simply install the adapter to convert the Pin-End sander into a Pinless one and then change the blade.
Using a sanding belt to sand a scroll saw
Using a sanding belt on your scroll saw can greatly improve the smoothness of the edges of your woodworking projects. These belts are made out of durable plastic and can be mounted to most scroll saw models. They are best used on larger woodworking projects such as tables, countertops, and cabinets, as they can effectively remove bumps and correct wandering cuts. These belts are available in 1/4" and 1/2" widths, as well as 80, 120, 180 and 220 grits.

A quality sanding belt can smoothen the edges of your scroll see and be used with a wide range of materials. It is best to have a range of grits available so that you can find the right one for your scrollsaw. A good gritbelt should be at minimum half an inches wide. It should be compatible with most scroll saws that take a 5'' blade.
FAQ
What kind tools do carpenters use to build?
Carpenters most often use a tool called a hammer. A hammer is used for pounding nails into wood. It is also used to help hold pieces together while working on a job. Other tools include clamps. pliers. screwdrivers. measuring tape. pencils. saws. drills. wrenches.
How do I know what type of wood I'm dealing with?
Always check the label before purchasing wood. The label should include information about the wood species and its moisture content as well as whether or not it has been treated using preservatives.
How long does it take you to finish a piece?
It depends on the size of the piece of furniture. Boxes and picture frames are small projects that can be completed in one day. Larger projects like tables and desks take many days. It takes time to stain and seal the wood properly.
Is it difficult to start my woodworking business?
It can be difficult to start your woodworking business. There are many requirements and regulations that must be followed. However, it doesn't necessarily mean you must go through all the hassle of setting up a business. Many people prefer to join existing companies. This allows you to join existing businesses and pay only membership fees.
Statistics
- Most woodworkers agree that lumber moisture needs to be under 10% for building furniture. (woodandshop.com)
- Average lumber prices rose about 600 percent between April 2020 and May 2021. (familyhandyman.com)
- In 2014, there were just over 237,000 jobs for all woodworkers, with other wood product manufacturing employing 23 percent; wood kitchen cabinets and countertop manufacturing employing 21 percent. (theartcareerproject.com)
- If your lumber isn't as dry as you would like when you purchase it (over 22% in Glen Huey's opinion…probably over 10-15% in my opinion), then it's a good idea to let it acclimate to your workshop for a couple of weeks. (woodandshop.com)
External Links
How To
How to make wooden joints
This tutorial will show you how to join two pieces of wood together. We will be using the "pocket-hole joint", which involves drilling holes in wood and then gluing them together. This method works great if your wood is straight and smooth. Try dowel joinery instead if your wood doesn't look straight. Here are the steps
-
Drill Pocket Hole Joints. Start by measuring and marking the spot where the pocket hole joint will be placed. You will then drill 3/4" deep holes through each piece of wood with a jigsaw, handheld drilling machine, or hand-held drill.
-
Sand Smooth. Sanding the wood's edges will help ensure that the joint won't split later.
-
Glue Together Apply glue to the sides of both wood. Let it sit for about 5 minutes before clamping the pieces together.
-
Connect the pieces. After the glue has dried thoroughly, secure the pieces so that they are flush.
-
Trim Joinery. Trim the excess wood around the joint after the glue has dried completely.
Allow enough space between pieces so you can turn them inside out.