
Many woodworkers want to know how to create perfect mitre joins. This article will cover several methods of creating them. Then we will show you how to create perfect 45-degree angles. We'll also show you how to fix mitre joints that have already been glued. Continue reading for more information.
Gluing mitre joints
This guide will help you make the process of gluing mitre junctions easy. Prepare the mitered corners prior to gluing. It is important that you align the miter corners if you are glueing a piece or wood that may come apart. After assembling the mitre joint, you can apply some wood adhesive to the mitred corners. Wipe off any excess adhesive with a damp cloth.
Closing a miter Gap
There are several ways to close a miter gap when woodworking projects. To close the gap, you can use a round object such a screwdriver shanks or nail-set pins. Then, you can use sandpaper to give the paint a toothy finish. If you can't afford to buy a rounded tool, you can simply force the filler into the gap using a knife.
Create a hidden spline
Hidden spline creating mitre joints flush with the mitered faces is a great way to achieve this. This is done by cutting a hole near the heel of your mitered face. The slot should be half to two thirds of the thickness the workpiece. This will maximize the length of the spline. Important: Before inserting the spline into the mitre joint, you must plane the stock.
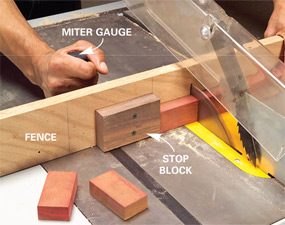
Getting perfect 45-degree angles
While perfect 45-degree angles are possible at miter joints, it can sometimes be difficult to do so when the pieces don't exactly match. There are two possible reasons. The first is that the pieces may be too long. The second reason is that the blade might not be perpendicular with the surface being cut. This can lead to compound angles. In either case, it's essential to scribe the angles correctly.

DOMINO wood jointing systems
Domino wood jointing systems can be used for miter joints. This jointing system is a cross between a biscuit and round dowel. It is strong enough for holding the pieces in their place. The system can also be easily cut and bent to your exact dimensions. You can quickly make mitered panel joints with the DOMINO wood joining system.
FAQ
What woods are suitable for making furniture?
Woods can be classified according to how hard they are. Softwoods include pine, fir, cedar, and cypress. They're often used for outdoor furniture because they don't rot easily. The hardwoods include teak, maple, mahogany and oak. Because they can't weather outside, they're usually used indoors.
How can I learn basic woodworking skills
It is an excellent way to learn how to build furniture. You can make a simple bench yourself. You can do this project using any type of wood you have on hand at home. If you are unsure what type of wood is best, you can get cheap pine boards at Lowes (or Home Depot) instead. After building your bench, sand off any rough edges and apply a stain or varnish.
How can my shop be organized?
Setting aside an area to store tools is the first step in keeping your workshop organized. You want your tools to stay clean and free from debris and dust. Pegboard hooks can be used to hang tools and accessories.
How does a beginner woodworker earn money?
Many people learn how to make furniture in order to set up an online business. If you are just starting to build furniture, there are many other ways to make money than selling on Etsy. Sell at craft fairs or other local events. Offering workshops could be another option for those who are interested in learning how to build their furniture. You might be able to offer services like remodeling homes or making custom pieces for clients if you are a skilled carpenter.
Is it necessary to be a genius in woodworking to succeed?
No. Woodworking does not require any special skills. It is possible to learn basic tools and techniques that will allow you to create beautiful art.
Are you able to teach yourself woodworking
You can learn everything best by doing. Woodworking is an art form that requires patience, practice, skill, and experience. Any craft requires patience to master.
The best way to learn how to do something is actually to do it. Start small and learn from your mistakes.
What material would you recommend to start learning woodworking?
Start off with softwood like pine and poplar. You will feel more comfortable with these softwoods, so you can move onto hardwood.
Statistics
- Average lumber prices rose about 600 percent between April 2020 and May 2021. (familyhandyman.com)
- The U.S. Bureau of Labor Statistics (BLS) estimates that the number of jobs for woodworkers will decline by 4% between 2019 and 2029. (indeed.com)
- The best-paid 10 percent make $76,000, while the lowest-paid 10 percent make $34,000. (zippia.com)
- In 2014, there were just over 237,000 jobs for all woodworkers, with other wood product manufacturing employing 23 percent; wood kitchen cabinets and countertop manufacturing employing 21 percent. (theartcareerproject.com)
External Links
How To
How to drive a nail through wood
To drive a nail into wood, the first step is to select the right size and type hammer. There are many types of hammers that you will find: claw hammers and sledgehammers; mallets; ball peen hammers; and hatchets. Each type of hammer has its pros and cons. A clawhammer works best when hitting something hard like nails. However, it can sometimes be difficult to see exactly where the strike is going. The sledgehammer works well for large areas, but is too heavy for smaller tasks.
Once you have chosen the right hammer for you, put your hand flat against its side so that it rests comfortably in the palm of your hand. Take the handle and hold it with both hands. But don't press down so hard you injure yourself. Keep your wrist relaxed and the hammer straight up. Then swing the hammer back toward the ground, aiming for the center of the nail. You should feel the impact from the hammer striking a nail. You can practice swinging the hammer with a block or wood until you feel the rhythm.
Once you are ready to drive the nail, place the hammer close to your body. Place the nail so that it is perpendicular with the wood's surface. Keep your attention on the tip. Swing your hammer forward. Then follow through with the motions of the hammerhead. Continue this motion several times, slowly increasing the speed of each swing. Once you have mastered this technique, increase the power of your swings. To make it more powerful, hold the hammer up high to your shoulder and then bring it down. You'll have more energy to work with.
Once you have successfully drilled the first hole in the nail, remove the hammer. To pull out the remaining nails, use a screwdriver or pry bar. To avoid splitting the wood, make sure the nail heads are not touching the board's surface.